
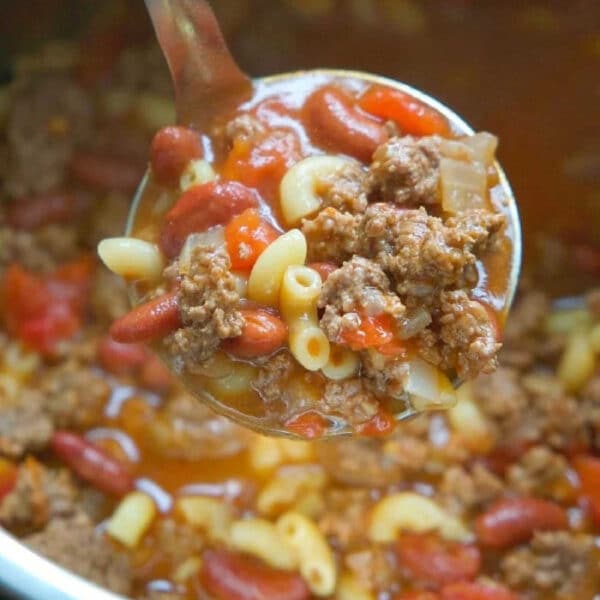
Our creamy Instant Pot sausage rice casserole recipe with cream of mushroom soup and hatch chiles is packed with flavor! A tasty one pot meal you can make in a Ninja Foodi pressure cooker with spicy Jimmy Dean ground sausage for heat lovers like you.

I must say this pressure cooker sausage rice casserole was over the top with flavor! I didn’t add any seasonings and it was amazing as is with the spices in the sausage and fresh hatch chiles! Sponsored by Albertsons. Find 100+ Instant Pot recipes recipes here.
Have you ever made smoked chiles?? They are just so versatile. You can make a similar dish in the oven. It is a creamy mixture of all your favorite things, a dump and go type of dinner if you will. With meat and rice together you can serve as is when you’re ready to eat.
Add some small frozen vegetables in there too if you want, corn kernels would be a good choice. Use any brand of pot you might have at home. You can make this two ways, in your multicooker pot or in the oven with our green chile rice for those directions. It is a lot quicker using this method though.

Ground Sausage and Rice Casserole with Hatch Chiles
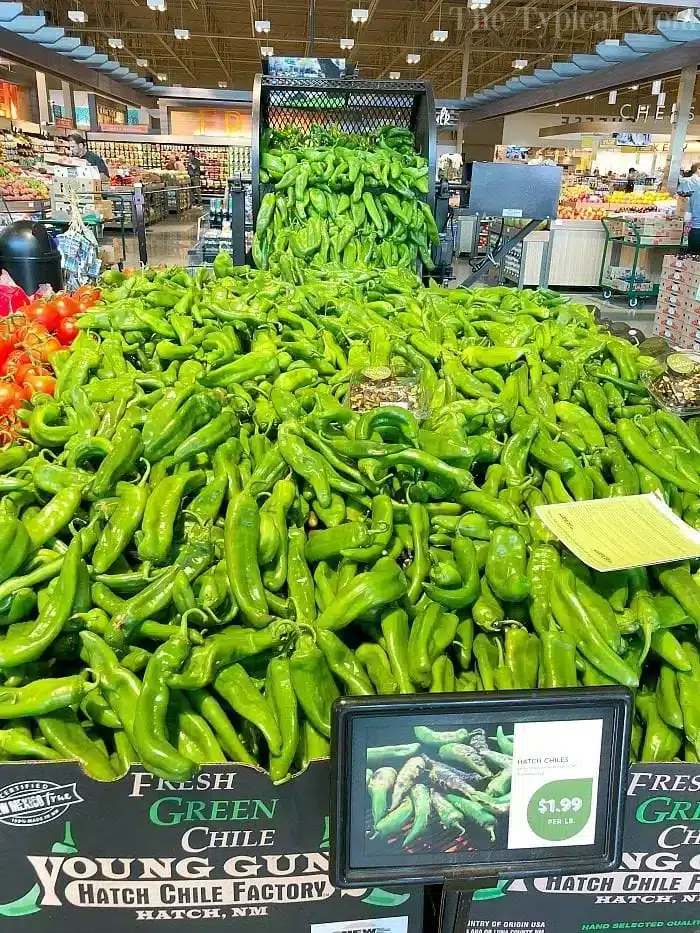
There were a few “heat levels” to choose from too, mild was what we got. When they were roasting them outside in that huge rotary machine they were giving out samples. I didn’t realize they gave me spicy and wow was I about to die. Too much for me but for others that is all they want. Choose your fave. Take a peek at how we incorporated them into this sausage and rice casserole.
Beautiful right??!! Don’t be too afraid. They have mild to extra spicy varieties. Just choose your desired heat level so you’re most comfortable when you’re done. If you choose the type without much heat at all like we do you should really use the spicy ground sausage from Jimmy Dean for this dish.
How do you make hatch chiles less spicy?
I have bought hatch chiles in a can before. With those you can choose mild or spicy. This time I was excited to see fresh, big, and beautiful ones at the store. They were having cooking demos, free samples, and even roasted chiles right in front of me! You can adjust the heat by removing the seeds and membrane which is where the heat is. If left in tact they will be over the top spicy!
I had an opportunity to see just how they did it using large drums. You could hear them pop and crackle as their skins were becoming blackened. From there it is easy to peel the skins right off they said and add it to any dish you like. Or lay them right on top of a burger. Check out how to roast hatch chiles in a roasting drum live here!
Ninja Foodi Sausage and Rice
If you just have a Crockpot Express then by all means use that one. We love Ninja Foodi recipes and that one works well too, plus a benefit. This one has the air crisp feature to melt another layer of cheese on top. Hatch chiles add a lot of flavor to any dish.
Ingredient Notes
Since they were in season and I generally just use canned, this time I picked up some fresh hatch chiles from the store that had been roasted already by them.
For the sausage we used a roll of pork ground sausage. Spicy Jimmy Dean version is great for this dish if you like heat
You will want to use long grain white rice. You add it uncooked – Instant Pot Jasmine rice timing would change slightly, read this post for info.
Can you use brown rice?
I haven’t tried with pressure cooker brown rice yet, because it would increase the cook time quite a bit and I think the rest of the ingredients would not hold up as well. Just my opinion, I wouldn’t do it.
As for the veggies I like diced Bell peppers to add a bit more texture to the soft meal and Onions once again are optional but a cheap way to add texture and flavor
As for the necessary liquid to cook the grains and everything together I used broth, half chicken stock and half vegetable
Cream of mushroom soup will make it creamy which is kinda’ expected in a casserole type of dish if you ask me.

How Long to Cook Sausage and Rice Casserole in Instant Pot
Once you have precooked your ground sausage, which will take 4-5 minutes, and combined everything else (with rice just submerged and not stirred in) you are ready to cook. I think that if you pressure cook for 10 minutes with a 2 minute natural release it is perfect. OR you can just press the rice button.
Variations
If you want to use chicken use our Instant Pot chicken and rice recipe instead. Now you can somewhat tweak this but need to make sure that the liquid to rice ratio remains the same. You can add 1/2 cup of drained other items like canned beans or frozen vegetables if you would like as well. Ready to give it a whirl??!! Let’s get to it!

Instant Pot Sausage and Rice Casserole
Equipment
Ingredients
- 1 lb ground sausage, pork, regular or spicy version is great
- 2 stalks celery, diced
- 2 tbsp hatch chile, I used roasted – skin, seeds and membrane removed, then diced – I used the mildest version, can use as much as you’d like depending on your heat level preferences (could dice them fresh if you don’t have the means to roast them too, they will soften in the IP)
- 1/2 small onion, diced
- 1 can cream of mushroom soup
- 2 1/4 cup chicken broth, or vegetable broth
- 1 cup white rice, added uncooked
- 1/2 small bell pepper, diced, optional
- 1 large green onion, diced, optional
- 2 tbsp olive oil
Instructions
- Set your pressure cooker to saute, add your olive oil and sausage. Break up into smaller pieces and cook for about 3 minutes.
- Add your diced onion and bell pepper if you choose to add them as well (can add chiles now or later). Cook until sausage is no longer pink.
- Turn your pressure cooker off, cancel button (important step to avoid the burn message showing up later).
- In a bowl whisk together your broth and cream of mushroom soup so it is pretty smooth.
- Leave ground sausage mixture in and spread out evenly on the bottom of your pot.
- Then pour your soup/broth mixture on top of that, do not stir!
- Add your diced celery and hatch chiles, then sprinkle your uncooked rice on the very top and just gently push down so rice is submerged in liquid. DO NOT Stir.
- Close your lid and steam valve and set to pressure low for 10 minutes.(If you do not have a low option just hit your rice button.)
- Allow for a 2 minute natural release, then do a quick release and then quickly lift the lid off so condensation on inside of lid doesn't fall into the casserole.
- Stir just slightly and allow to sit for at least 5 minutes to naturally thicken.
- Serve and top with diced green onions or chives on the top!
Video
Nutrition
Nutrition information is automatically calculated, so should only be used as an approximation.
Our hatch chiles gave this Instant Pot sausage rice casserole an added kick of flavor and a bit of heat! Here’s what you need Green onions are optional but add some extra texture when sprinkled on the top when done.
If you want to make something similar to this in the oven, try our chile relleno casserole recipe. Looking for more Instant Pot sausage recipes?
- Pressure cooker sausage soup is amazing
- Instant Pot stuffed cabbage could use ground sausage instead of ground beef
- For a vegetarian Instant Pot rice try this Instant Pot mushroom rice recipe
Prep plus pressure cook time should be a total of about 20 minutes just for reference. It’s a quick and creamy dinner choice!


Cooking right now! Live in the Labd of Enchantment so I’m lucky to have green chile in my freezer from last years crop (almost roasting time again😋). Store accidentally sent me parboiled rice. Hope it works lol!
Thanks for the recipe. Sure smells great!!
*Land of Enchantment 🙄
Needed a quick dinner…didn’t have chili’s or green peppers. Removed 3/4 of Chicken stock and replaced it with 3/4 of white wine to deglaze. Added 2 cups of cooked peas at the end after pressure cooking. Awesome quick dinner!!! Thanks for the recipe!!!
Yay!
Can this be doubled
Just made this tonight (minus the chili peppers as I couldn’t find any, aldi didnt even have canned) it was still amazing!! Definitely a go to meal!
Cooking this right now….. thank you for recipe.
I found your meat, veggies and bean cooking times at Pinterest. I have a question about the meat times–are they per pound? I am sharing with friends.
Thanks very much,
Deborah
No the numbers on the side are the # of minutes on pressure high it takes to cook. It doesn’t list pounds and I know that varies, that is why there is a range for each one. It is basically a good gauge to start with and has helped me in creating a lot of recipes, to know about how long. If I know it is on the larger size, for a roast or so I will go with the longer time. Hope that helps.