How to print using freezer paper with inkjet printer so you can customize anything right at home. Create personalized t-shirts on fabric, wood signs, pillows and more using Reynolds freezer paper. Here are step by step instructions of how you can do it too and make gifts everyone will love.
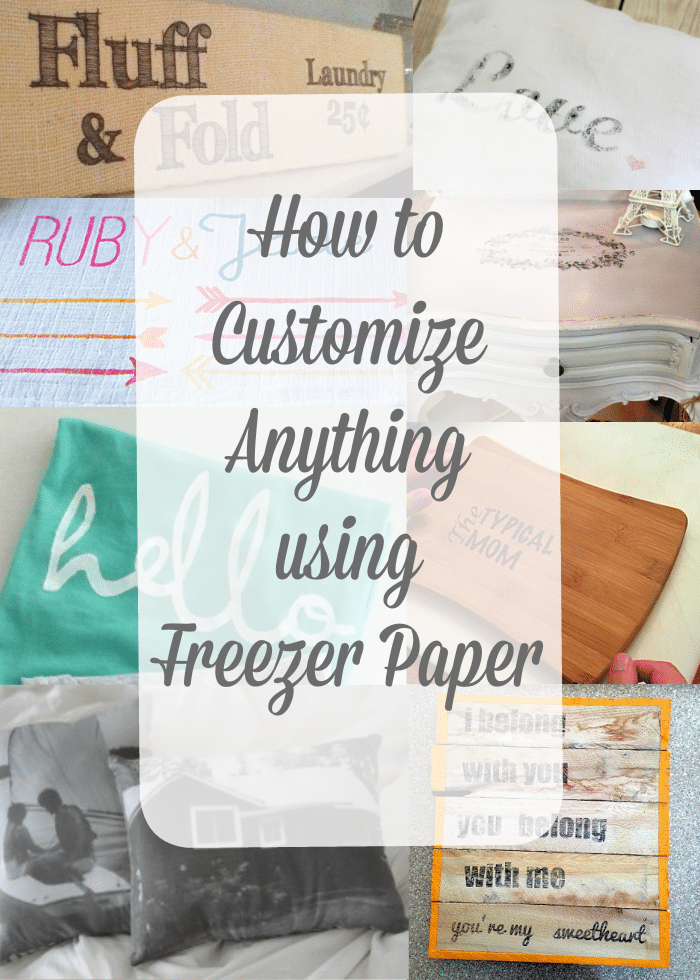
I know…you’re probably wondering what the heck I am talking about. When you see how to print using freezer paper you’re gonna’ freak out. Using your printer, freezer paper, and a hard surface you can transfer an image on to a piece of cloth or wood! Here is how we did it and a roundup of other clever ways from other bloggers at the bottom of this post! (affiliate links present)
Printing with Freezer Paper
First off you’ll need to order some freezer paper here! Reynolds is the best known name in this category. I would just buy it and not chance it with store brand or something out of the ordinary. Here is step by step directions and pictures showing you how to do it right at home (we used a wood cutting board).

How to Print Using Freezer Paper
I’m going to share screenshots so you can follow along as we go here. This is a great Teacher appreciation gift idea.
- Let me show you how easy it is.
- The first thing you need to do is find a picture you want on the computer. OR create one in Word.
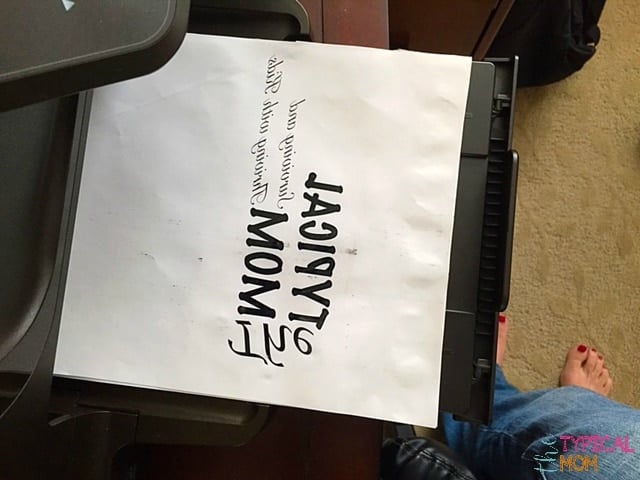
- Once you have the image done you need to do a 3D rotation option of 180 degrees on the image. That way when it is put on it goes on the correct direction.
- If you don’t know how to do that just google the instructions
- different operating systems and computers are different, just find how to do it on yours. If you have a Mac you can do it in the printing stage by clicking this button.
- Now get your paper ready. You want to cut sheets to the same size as a regular printer paper sheet. Use a razor or scissors to do this, if it’s slightly larger it will get clogged.

How to use freezer paper to transfer images
You need it to be on a harder surface. We are going to use a glue stick and glue the shiny side UP. Now glue it on to a piece of paper.
- Then you will need to feed your piece of freezer paper into your printer. Feed it thru so that it prints on the shiny side of the freezer paper. Printing on the wrong side won’t let it transfer on to your piece of fabric.
- You must use an inkjet printer!
- A laser printer will not work.
- Allow the ink to dry now.
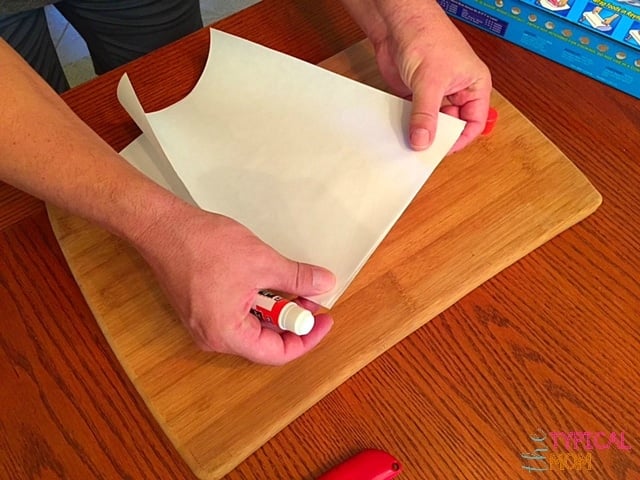
How to print on freezer paper with Inkjet
The print will come out on your freezer paper. Now you need to find a piece of cloth, pillow, t shirt or cutting board similar to what we used. Use whatever you want it to transfer on to.
- Cut off loose threads on any fabric. Freezer paper should be ready with the design from your ink jet printer on it.
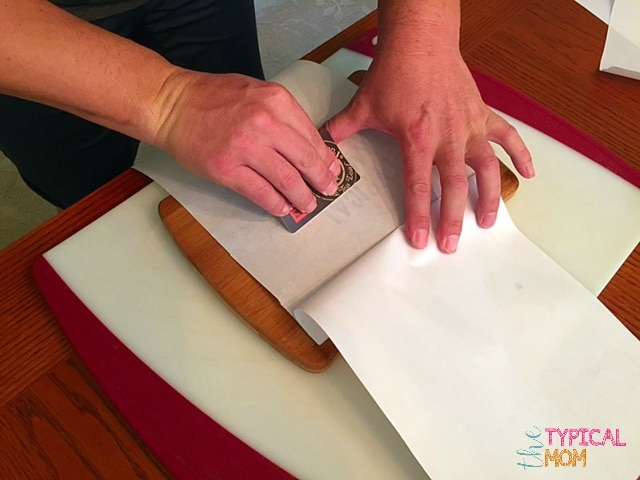
- Find something hard and flat like a credit card, side of a school type eraser, etc… These will allow you to scrape the image off.
It will come out of your printer looking like this. Yes it is backwards on your paper but that is correct.
How to transfer image to fabric with freezer paper
- Scrape from the top to the bottom and every inch of the design. You want it to rub off on to your desired piece all the way.
- Some say a hot iron transfers it too but I haven’t done that
- Once you are done you will have a customized piece that you can give away or keep for yourself. 😉
- It works on wood as well as you can see below, or material like the pillow.
- You can use the freezer paper design multiple times or until the ink wears out too.
Make sure you get it really scraped off before lifting up your freezer paper. This will ensure all of your wording/picture comes off.

How to Print on Wood
Fun DIY project right. Great to customize a cutting board like this. You could use as a gift or a project for a Boy or Girl scout troop too….just perfect it beforehand. Inexpensive way to jazz up things and make them customized. You can have a name printed or later I added flowers around The Typical Mom to embellish it…..use your creativity. 😉
As for materials I found it harder to do this on cotton, seems to run a bit. I would use something a bit stiffer. Customizing a plain table runner or piece of material is easy. You can later recover a pillow that isn’t a cotton t-shirt like material works best.
Here is a great video from Easy Sewing for Beginners on how to print on fabric using freezer paper. Great demonstration.
How to print using freezer paper video

Freezer paper printer ideas
Here are a few other great ways on how to print using freezer paper from other crafters!
- Another blogger from Make the best of things here has apparel uses this to personalize shirts etc..
- Little Bit Funky has a great tutorial on making signs using freezer paper to transfer letters and images on wood etc
- A Mom’s Take creates custom pillows using a freezer paper technique….this looks really cute!
- Country Design Home uses this technique to create a custom look on a piece of furniture.
- Pretty Providence uses freezer paper stencils to create custom, and really cute, t shirts customized for everyone.
- Whipperberry has a great example of using freezer paper to create customized blankets and more…perfect for a baby shower!
- DIY Village creates really cute signs on burlap using the freezer paper transfer technique.
- A Spotted Pony transfers pictures on to pillows using freezer paper…love this idea.
- If you love easy DIY ideas check out our post on how to make burlap garland!



My HP deskjet won’t print on the freezer paper, do you know why?
I’m guessing the Deskjet is a Laser jet printer and not an inkjet printer. 🙁
Interesting and informative post. But, how exactly is the paper put into the printer? I assume paper side up, fabric on the bottom? Also, is it necessary to rotate the print to the 180 degrees? Thank you.
If you print directly on the fabric no but if you print onto the freezer paper to transfer the image you need to otherwise your words/image will be backwards.
I am a bit confused, i have read other websites to where u print on the freezer paper and then u
transfer it onto the fabric?
So, if all u do is the freezer paper as a back up why do we need it, and not use just regular paper,
I dont understand where the freezer paper comes in?
You do print on the freezer paper on your printer.
I have read that also. I like both. Different looks.
Where do I go to get words, fonts etc to make up quotes. How do you have one word vertical and other words horizontal ? I am new at all of this
How do you keep the transferred item to remain ‘permanent?’ On wood, like a cutting board, won’t it just wash off? On fabric won’t it fade (when washed)? I can see doing this for wood signs and then possibly sealing with clear acrylic spray, but I would guess brushing on some sort of sealer would smear/run the ink. Just wondering….
How well does this work for transferring to glass / plastic items such as platters?
you can cut a piece of freezer paper and some light coloured cotton fabric A4 , same size as your computer paper. iron the waxy side to the wrong side of your fabric. watch for loose threads and trim them off carefully. work out how your paper goes through the printer. I have to put mine fabric side down. then print. a bit scary the first time and I did have the odd jam in the beginning, but now I’m more confidant it goes through easily. you can scan photos into your computer and play around with them, great fun.
I am wanting to do this on double faced satin for a bookmark. Can you seal the design with something to still have fabric that’s pliable but protects the design? Like I have used hairspray on chalk drawings. But ribbon definitely different – feedback please.
Does this work with a laser printer?
Unfortunately no
The ink seems to run on my freezer paper so it comes out if the printer smudged. What am I doing wrong?
wrong side of paper